If you've ever clicked that little dropdown that says "Normal" in your Layers panel and wondered what all those options actually do — this guide is for you. Whether you're searching to understand "what is blend mode" or looking for practical examples of "what are blend modes" used by professionals, this tutorial will clear up the confusion.
Blend modes are one of those things that seem confusing at first, but once they click, you'll use them every single day.
What Are Blend Modes?
Blend modes are basically instructions that tell Photoshop how two layers should interact with each other. Instead of just stacking one layer on top of another, blend modes let you combine them in creative ways — darkening, lightening, adding contrast, mixing colors, and a lot more.
The best part? They're completely non-destructive. Your original pixels never actually change. You're just changing how Photoshop displays them on screen. So you can always switch back to Normal or try a different mode with zero risk.
Think of it like this: Normal mode is like placing a piece of paper on top of another piece of paper. Blend modes are like using tracing paper, cellophane, a magnifying glass, or a color filter instead — each one shows the layers underneath in a completely different way. This is a foundational skill, much like understanding What Are Alpha Channels for transparency control.
Pro Tip
You need at least two layers for blend modes to work. The layer you apply the blend mode to is called the Blend Layer. The layer below it is the Base Layer. Photoshop combines them pixel by pixel.
How Do They Actually Work?
Under the hood, every blend mode is a math formula. Photoshop looks at each pixel in your blend layer, compares it to the matching pixel in the base layer, and then calculates what color should appear on screen.
You don't need to understand the math to use blend modes well. But knowing the basic logic behind each group helps you pick the right one without randomly clicking through all of them.
Here's the simplified version: dark pixels (close to black = value 0) and light pixels (close to white = value 255) behave very differently in different blend modes. Some modes make whites disappear, some make blacks disappear, and some boost contrast. That's really the core of it.
Where to Find Blend Modes in Photoshop
Most people only know about blend modes in the Layers panel, but they actually show up in several places:
Watch Out
Warning: If you have the Brush tool selected and use a keyboard shortcut, it changes the Brush tool's blend mode — not the layer's. Always press V (Move Tool) first before using blend mode shortcuts.
All 27 Layer Blend Modes Explained
Pro Trivia
Did you know? The original 19 blend modes were introduced way back in Photoshop 3.0 (1994). Today, there are exactly 27 layer blend modes standard in the dropdown menu, split into visual groups.
Workflow Tip: Live Hover Preview
Stop clicking! In modern Photoshop versions, simply clicking the Blend Mode dropdown structure and hovering your mouse over the list will give you a live preview of every effect on your canvas instantly.
Group 1 — Normal (the default group)
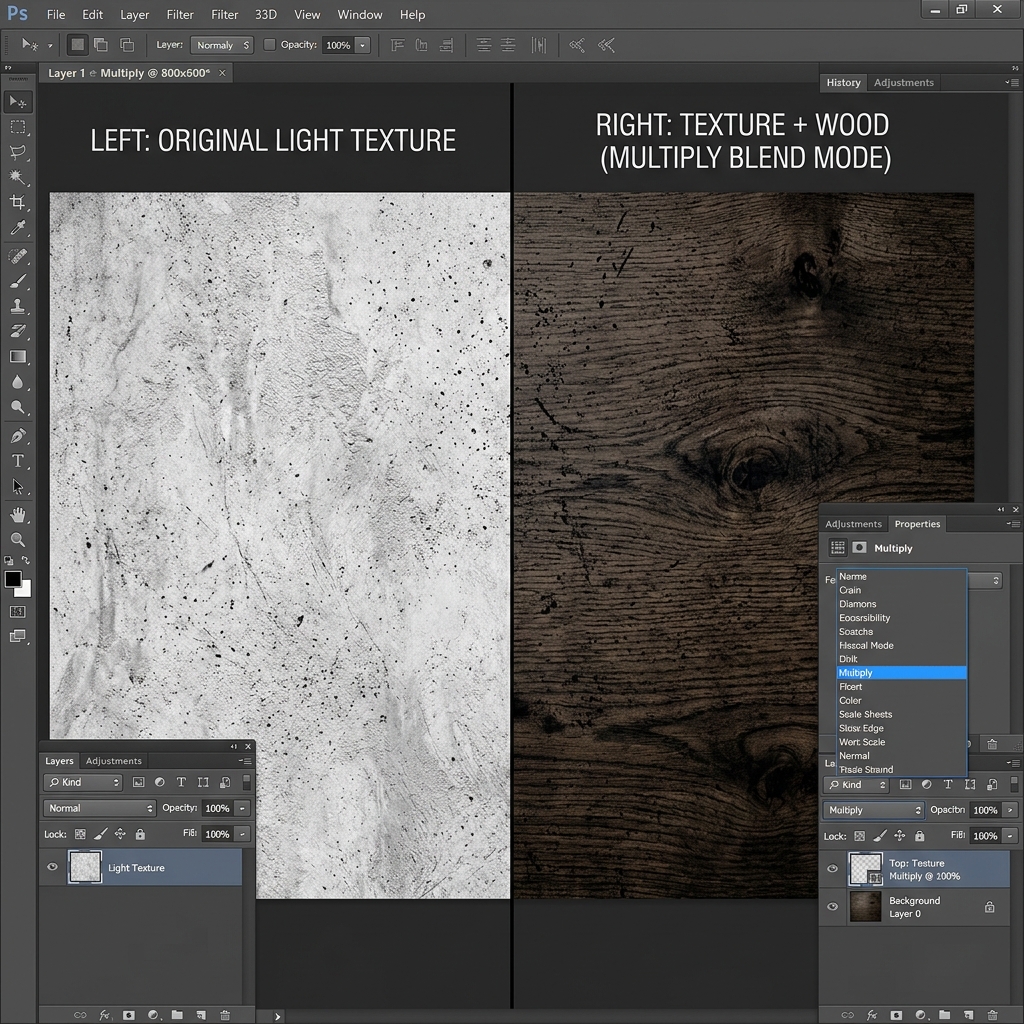
Group 2 — Darken (white disappears)
Every mode in this group makes the image darker. White in the blend layer becomes invisible. This group is great for adding textures, dark overlays, and shadows.
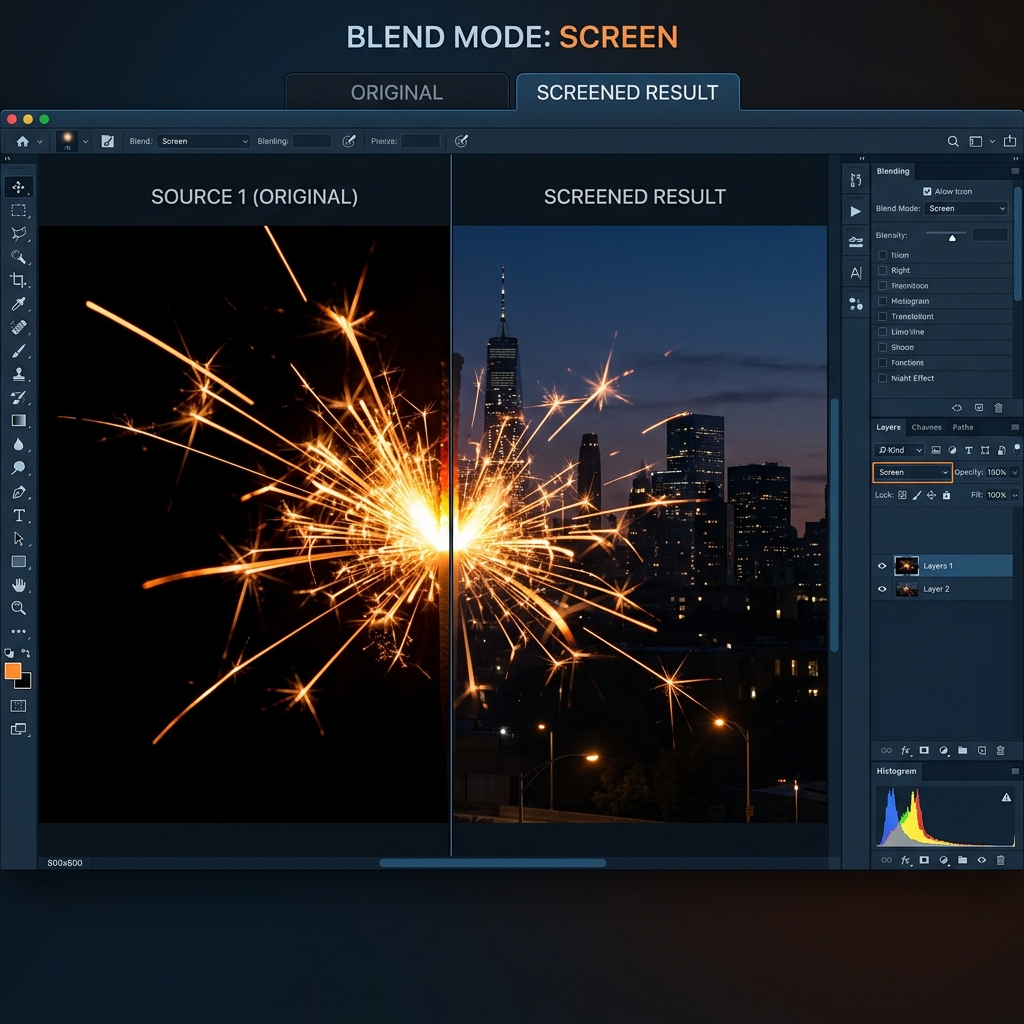
Group 3 — Lighten (black disappears)
The opposite of Darken. Every mode here makes things lighter. Black in the blend layer disappears. Perfect for smoke, fire, stars, light leaks, and glows shot on black backgrounds.
Group 4 — Contrast (50% gray disappears)
These modes increase contrast — making darks darker and lights lighter. 50% gray in the blend layer becomes completely invisible, which makes this group ideal for sharpening and detail enhancement.
Note on Hard Mix
Hard Mix actually does not have an official default keyboard shortcut mapped in Photoshop. You will always need to select it manually from the dropdown menu!
Groups 5 & 6 — Inversion and Cancellation
Technically, Photoshop splits this section into two distinct mathematical groups. The Inversion group (Difference/Exclusion) looks for variations between layers, while the Cancellation group (Subtract/Divide) mathematically removes values.
Group 7 — Component (Color-based)
These modes blend specific color properties — hue, saturation, color, or luminosity — instead of all of them at once. These are the "precision" modes for color grading and retouching.
The Blend Modes You'll Actually Use (The Core 6)
You don't need to memorize all 27. In real-world editing, about 95% of work uses just these six:
Keyboard Shortcuts — Complete List
Using shortcuts instead of clicking through the dropdown is a huge time saver. To cycle through all modes one by one, press Shift + + (forward) or Shift + - (backward). To jump directly to a mode, use the shortcuts below (make sure the Move Tool is selected first).
| Blend Mode | Windows Shortcut | Mac Shortcut |
|---|---|---|
| Normal | Shift+Alt+N | Shift+Opt+N |
| Dissolve | Shift+Alt+Q | Shift+Opt+Q |
| Multiply | Shift+Alt+M | Shift+Opt+M |
| Screen | Shift+Alt+S | Shift+Opt+S |
| Overlay | Shift+Alt+O | Shift+Opt+O |
| Soft Light | Shift+Alt+F | Shift+Opt+F |
| Hard Light | Shift+Alt+H | Shift+Opt+H |
| Color Dodge | Shift+Alt+D | Shift+Opt+D |
| Color Burn | Shift+Alt+B | Shift+Opt+B |
| Difference | Shift+Alt+E | Shift+Opt+E |
| Exclusion | Shift+Alt+X | Shift+Opt+X |
| Hue | Shift+Alt+U | Shift+Opt+U |
| Saturation | Shift+Alt+T | Shift+Opt+T |
| Color | Shift+Alt+C | Shift+Opt+C |
| Luminosity | Shift+Alt+Y | Shift+Opt+Y |
Note
Several modes have no standard keyboard shortcuts natively mapped inside Photoshop (such as Hard Mix, Darker Color, Lighter Color, Subtract, and Divide).
Opacity vs Fill — What's the Difference?
Both Opacity and Fill control how transparent a layer is. For most blend modes, they behave exactly the same. But for 8 specific blend modes — called the "Special 8" — they produce different results.
The key difference: Fill doesn't affect Layer Styles (like Drop Shadow or Outer Glow), but Opacity does. So if you lower Fill on a layer with a drop shadow, the drop shadow stays fully visible while the layer itself fades out. Lower Opacity and everything fades together.
The Special 8 modes that behave differently with Fill vs Opacity are: Color Burn, Linear Burn, Color Dodge, Linear Dodge, Vivid Light, Linear Light, Hard Mix, and Difference. Try setting Hard Mix to Fill 20% — it looks much more refined than Opacity 20%.
Real-World Uses and Creative Tricks
The Special 8
Remember: The "Special 8" (Color Burn, Linear Burn, Color Dodge, Linear Dodge, Vivid Light, Linear Light, Hard Mix, and Difference) behave much more naturally when you use Fill instead of Opacity.
Top Verified Photoshop Tutorials
Don't waste time on bad tutorials. These creators are the gold standard for learning Photoshop properly:
Search: 'Photoshop Training Channel Blend Modes'
Search: 'PHLEARN Blend Modes Mastering'
Search: 'Adobe Photoshop Blend Modes Guide'
Search: 'Piximperfect Blend Mode Tricks'
Need PSD Help?
Your time is worth more than solving pixel errors. Hire a professional editor to handle the technical work while you focus on your business.
Frequently Asked Questions (FAQ)
How many blend modes are in Photoshop?+
There are exactly 31 blend modes in total in Photoshop. You will find 27 layer blend modes in the main dropdown. Additionally, there is "Pass Through" (for layer groups), "Behind" and "Clear" (exclusive to painting tools), and "Add" (available inside Calculations and Apply Image commands).
Do blend modes damage my original image?+
No. Blend modes are completely non-destructive. They only change how pixels look on screen — your actual pixel data stays untouched. You can switch back to Normal mode at any time.
Which blend mode should I start with as a beginner?+
Start with Multiply, Screen, and Overlay. These three cover probably 80% of real-world use cases and once you understand how they work, the rest of the modes start making a lot more sense.
Can I use blend modes on text layers?+
Yes! Blend modes work on text layers, adjustment layers, smart objects, groups — basically any type of layer. You can create some really interesting typography effects this way.
What is the difference between Opacity and Fill?+
Both control transparency, but Fill doesn't reduce the visibility of Layer Styles (like drop shadows or glows), while Opacity does. For 8 specific blend modes, they also produce visually different results.
Do blend modes affect file size?+
Not significantly. Blend modes themselves don't add data. However, having many layers in a document (regardless of blend modes) increases file size and rendering time.
Conclusion
Blend modes are one of those features where the more you use them, the more natural they become. You don't need to memorize all 27 — just learn the core six (Multiply, Screen, Overlay, Soft Light, Color, Luminosity) and you'll be able to handle most editing tasks confidently.
The real skill isn't knowing what every mode does in theory. It's knowing which group to reach for depending on what problem you're trying to solve — darken, lighten, add contrast, or shift color. Once you have that mental map, the rest clicks into place pretty quickly.
Now open Photoshop, stack two images, and just start cycling through modes with Shift++. That's genuinely the fastest way to learn.
Get Started with Professional Edits
If you are looking for advanced compositing results or want to Hire a professional to design your PSD files, feel free to contact us. Experimenting with different modes will help you master the craft quickly!
Verdict: The Magic of Digital Blending
Blend modes are the single most powerful tool for creative compositing in Photoshop. Once you master the 'big three'—Multiply, Screen, and Overlay—you've unlocked about 90% of a pro editor's technical capability. Don't memorize the math; focus on the results. Experimentation is your best teacher.
Need PSD Help?
Your time is worth more than solving pixel errors. Hire a professional editor to handle the technical work while you focus on your business.
About the Author
Devla Sarika Singh
Image Editor | PSD Mockup Designer | Photoshop Expert
I am a professional image editor specializing in Photoshop, custom PSD mockups, and high-quality image editing. I help businesses and creators convert images into editable mockups, with services like background removal, bulk mockups, and product image editing.