What Are Adjustment Layers?
In the early days of Photoshop, every tonal and color edit was permanent. You brightened a photo, saved the file, and that was it — the change was burned into the pixels forever. If you changed your mind the next day, you were starting over.
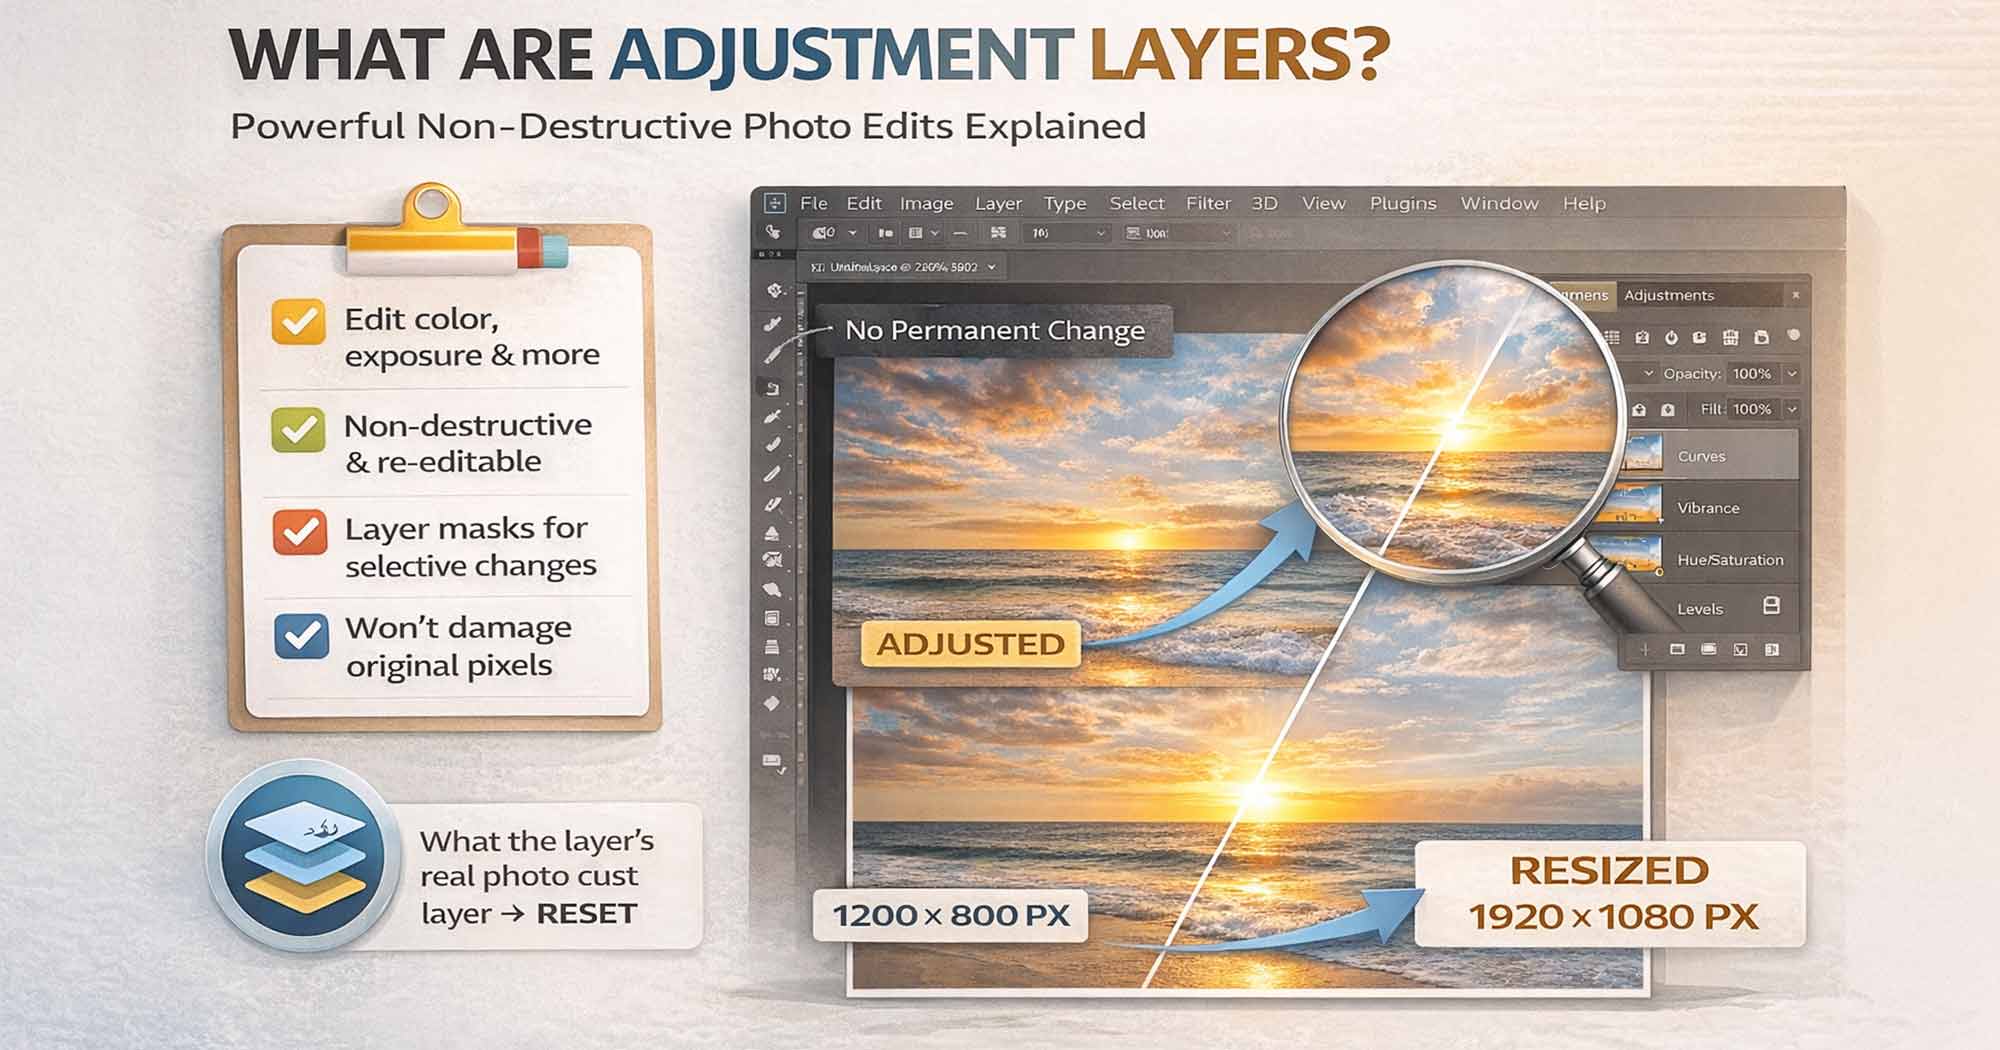
Adjustment layers solved this problem. They work like a sheet of tinted glass placed above your image layer in a PSD file. The glass changes what you see, but the image underneath is never touched. This is the foundation of non-destructive editing — the professional standard for all serious Photoshop work.
Formal Definition
An adjustment layer is a special layer type in Adobe Photoshop that applies color and tonal adjustments to all layers beneath it — non-destructively. The original pixel data is never modified. The adjustment is stored as instructions, not altered pixels. You can change, disable, or delete it at any time with zero quality loss.
The key distinction is this: Image → Adjustments applies changes directly and permanently to the pixels of the selected layer. Adjustment Layers do the exact same thing visually — but as a separate, always-editable layer that floats above. The output looks identical. The difference is entirely in whether you can change your mind later.
The Professional Rule
Never use Image → Adjustments directly on a layer unless you have a deliberate reason. Always use Adjustment Layers instead. The file size cost is minimal. The editability gain is permanent.
How Adjustment Layers Work
When you create an adjustment layer, three things happen at once:
A New Layer Is Created Above Your Image
It appears in the Layers panel with a distinctive icon — a sun for Brightness/Contrast, a histogram shape for Levels, an S-curve for Curves, and so on. You can reorder it, rename it, group it, and toggle its visibility just like any other layer.
A White Layer Mask Is Automatically Attached
Every adjustment layer comes with a built-in mask. White means the adjustment shows everywhere beneath it. You can paint black onto the mask to hide the effect in specific areas, or use a gradient for smooth transitions. This gives you surgical control over exactly where the adjustment applies.
The Properties Panel Opens Automatically
This is where you control the adjustment settings — sliders, curves, color pickers, dropdowns. You can reopen it at any time by double-clicking the adjustment layer's left thumbnail icon in the Layers panel.
The adjustment affects all layers beneath it in the stack by default. If you move it above a layer, it affects that layer. If you move it below, it does not. Layer order matters at all times.
Understanding the Mask Rule
| Mask Color | Effect | Status |
|---|---|---|
| WHITE | Full adjustment is visible — 100% effect applied to all layers below. | Visible |
| GRAY | Partial adjustment — the effect is reduced based on how dark the gray is. | Partial |
| BLACK | Adjustment is hidden — 0% effect, original image shows through completely. | Hidden |
To selectively edit one part of an image — darken only the sky, brighten only the subject's face — create the adjustment layer, click the mask thumbnail to select it, and paint with a black brush to hide the effect wherever you do not want it. A soft-edged brush with reduced opacity creates gradual, natural-looking transitions.
How to Create an Adjustment Layer (3 Methods)
Method 1 — Layers Panel Button (Fastest)
Click the half-black, half-white circle at the bottom of the Layers panel and choose your adjustment type from the dropdown list. The new adjustment layer appears immediately above the currently selected layer.
Method 2 — Top Menu
Go to Layer → New Adjustment Layer → [Type]. A dialog appears letting you name the layer and optionally create a clipping mask before placing it.
Method 3 — Adjustments Panel (Best for Speed)
Open Window → Adjustments to see a panel of clickable icons for every adjustment type. A single click creates the layer instantly — fastest method once you know the icons.
Every Adjustment Layer Type Explained (2026 Complete List)
Photoshop now offers a comprehensive suite of adjustment layer types following the January 2026 update (version 27.3), which added Color & Vibrance, Clarity/Dehaze, and Grain as native non-destructive tools. Here is every type, organized by function.
Tone and Exposure
Brightness / Contrast — The simplest tonal adjustment. Two sliders: one for overall brightness, one for contrast. Best for quick fixes on balanced images. Not ideal for nuanced control — use Curves or Levels for anything complex.
Levels (Ctrl+L / Cmd+L) — Uses a histogram with three input sliders: black point (shadows), midpoint (midtones), and white point (highlights). Output sliders at the bottom let you cap the darkest and brightest values. Excellent for fixing underexposed or overexposed photos quickly. More visual and intuitive than Curves for beginners.
Curves (Ctrl+M / Cmd+M) — The gold standard for tonal control. A diagonal line represents the entire tonal range from pure black (bottom-left) to pure white (top-right). Click anywhere on the line to add a control point and drag it up to brighten those tones, down to darken them. You can control individual RGB channels separately for precise color correction. More powerful than Levels for professional work.
Exposure — Mimics camera exposure controls with three sliders: Exposure (overall brightness in stops), Offset (shadows), and Gamma Correction (midtone bias). Designed primarily for HDR and 32-bit images. Less common in everyday editing.
Color Adjustments
Hue / Saturation (Ctrl+U / Cmd+U) — Three sliders: Hue (shift all or specific color ranges), Saturation (intensity), Lightness (brightness per channel). The dropdown at the top lets you target specific color ranges — for example, shifting only the blues in a sky without touching anything else. The Colorize checkbox fills the entire image with a single hue for duotone-style effects.
Color Balance (Ctrl+B / Cmd+B) — Adjusts color independently in Shadows, Midtones, and Highlights using three pairs of opposing sliders (Cyan–Red, Magenta–Green, Yellow–Blue). Useful for fixing color casts or adding stylized color grades to specific tonal zones.
Black & White (Ctrl+Alt+Shift+B / Cmd+Option+Shift+B) — Converts color images to grayscale with per-channel luminance control. Unlike simple desaturation, you can control how dark or light each original color converts — making yellows darker to add drama to a sky, for example. One of the most powerful tools for black and white photography.
Photo Filter — Simulates physical lens filters (Warming filters, Cooling filters, custom color tints). Useful for quick color temperature shifts or matching the mood of a scene. The Density slider controls the intensity.
Channel Mixer — Controls how much each RGB channel contributes to the output image. Used in advanced color grading, monochrome conversions with precise tonal control, and infrared photography simulation.
Color Lookup (LUT) — Applies a .CUBE or .3DL Look-Up Table file to the image for instant cinematic color grades. Adobe includes a library of built-in LUTs. This is how professionals apply consistent film-style grades across multiple images.
Selective Color — Adjusts the Cyan, Magenta, Yellow, and Black values within specific color ranges (Reds, Yellows, Greens, Cyans, Blues, Magentas, Whites, Neutrals, Blacks). Provides very precise control over how specific colors look — for example, making a green slightly more yellow without changing anything else in the image.
New in Photoshop 2026 (Version 27.3, January 2026)
These three adjustment layers were added in the January 2026 Photoshop update (version 27.3). Previously, these controls were only available inside Camera Raw or Lightroom — now they work as fully maskable, non-destructive adjustment layers directly inside Photoshop.
Color & Vibrance — The most critical addition for color grading. This layer adds native Temperature and Tint sliders, finally enabling direct white-balance correction inside the Layers panel without forcing you into Camera Raw. It also intelligently boosts saturation on muted tones while protecting skin colors.
Clarity and Dehaze (Single Panel) — Clarity enhances midtone contrast for added punch and definition. Dehaze cuts through atmospheric haze and low-contrast conditions. Crucially, these are not two separate layers — they exist as twin sliders inside a single "Clarity and Dehaze" properties panel. Both are fully maskable.
Grain — Adds film-like texture as a non-destructive layer. Useful for adding an analog, photographic feel to digital images, for matching grain across composite layers, or for masking the artificial smoothness that AI-generated content often has. Fully controllable and reversible.
Why This Matters
Before January 2026, getting White Balance corrections, Clarity, or Dehaze on a specific layer required a round-trip to Camera Raw. These are now fully integrated into the standard Photoshop adjustment layer workflow — maskable, clippable, and non-destructive.
Creative and Special Effects
Invert (Ctrl+I / Cmd+I) — Flips all color and tonal values to their exact photographic opposites. Turns whites black, blacks white, and inverts every color to its complement. Commonly used for creating negatives, special effects, and certain compositing techniques.
Threshold — Forces every pixel to either pure black or pure white based on a luminance cutoff slider. Any pixel brighter than the threshold becomes white; darker becomes black. Used for graphic, high-contrast design effects and as a tool for identifying the brightest and darkest points in an image for color correction.
Posterize — Reduces the number of distinct tonal levels in the image, creating a simplified, graphic-art, or screen-print aesthetic. A levels value of 2 creates a stark, two-tone result; higher values add more tonal gradation.
Gradient Map — Maps a chosen gradient to the image's tonal range. The leftmost color of the gradient maps to the darkest shadows; the rightmost color maps to the brightest highlights. At full opacity and Normal mode, it replaces the image's color entirely. At lower opacities or with blend modes like Color or Soft Light, it creates elegant, high-end color grades. This is one of the most underused and most powerful tools in Photoshop for creative color work. Combine these with various Photoshop Blend Modes to unlock professional cinematic effects.
Adjustment Layers vs. Direct Image Adjustments
| Feature | Image → Adjustments | Adjustment Layers |
|---|---|---|
| Non-Destructive | No (Permanently alters pixels) | Yes (Original pixels never touched) |
| Re-Editable | No (Cannot be changed after saving) | Yes (Always editable, no limit) |
| Built-In Mask | No (Must select and mask manually) | Yes (Mask included automatically) |
| Blend Mode Control | No | Yes (Full access to all blend modes) |
| Opacity Control | No (Not after applying) | Yes (0–100% at any time) |
| File Size Impact | Minimal | Very small (stores data only, not pixels) |
| Stack Multiple | No (Each bakes into the previous) | Yes (Stack as many as needed) |
Clipping Masks: Adjusting One Specific Layer
By default, an adjustment layer affects every layer below it. But most professional workflows require adjusting a single layer in isolation — brightening only the subject, not the background; shifting color on just one product element.
That is exactly what Clipping Masks do. A clipped adjustment layer affects only the single layer directly beneath it in the stack, and nothing else.
Method 1 — Alt/Option Click (Fastest)
In the Layers panel, hover your cursor in the gap between the adjustment layer and the layer below it. When you see the clipping icon appear (a small square with a down-pointing arrow), hold Alt (Windows) or Option (Mac) and click. The adjustment layer indents slightly to show it is now clipped.
Method 2 — Create Clipped From the Start
When creating a new adjustment layer via Layer → New Adjustment Layer, check "Use Previous Layer to Create Clipping Mask" in the dialog before clicking OK.
Method 3 — Keyboard Shortcut
Select the adjustment layer and press Ctrl+Alt+G (Windows) or Cmd+Option+G (Mac). This is a toggle — pressing again removes the clipping mask.
Pro Tip: Stack Multiple Clipped Adjustments
You can stack multiple adjustment layers all clipped to the same single layer below. This lets you combine Curves, Hue/Saturation, and Selective Color all targeting only one object in your composition. For example: a product shot where you adjust only the packaging color without touching the background.
Using Blend Modes with Adjustment Layers
Changing an adjustment layer's blend mode does not just apply the adjustment differently — it changes how the adjustment interacts with the layers below, opening up effects impossible with direct editing.
| Blend Mode | Effect on the Adjustment | Best Use Case |
|---|---|---|
| Multiply | Darkens. Values above 50% gray progressively deepen the image. | Add depth to shadows without losing texture. |
| Screen | Lightens. Values below 50% gray progressively brighten the image. | Lift highlights gently and non-destructively. |
| Overlay | Boosts contrast — darkens darks, brightens brights. | Add punch to flat images. Curves on Overlay for strong contrast. |
| Soft Light | Subtle contrast boost, softer than Overlay. | Professional color grading, cinematic tinting. |
| Color | Applies color only, ignores brightness entirely. | Color tints and shifts without changing exposure. |
| Luminosity | Applies brightness only, ignores color data. | Curves contrast without shifting or saturating colors. |
Cycle Blend Modes in Real Time
Select the Move Tool (V), then press Shift + Plus (+) to cycle to the next blend mode or Shift + Minus (–) to cycle back. This lets you preview every blend mode live without opening any dropdown.
Professional Techniques
Practical Workflow: Retouching a Portrait Step by Step
Here is how these layers work together in a real professional portrait workflow:
Correct Exposure First — Levels or Curves
Add a Levels adjustment layer and drag the white point input slider inward to snap the brightest part of the image to pure white. Drag the black point inward to set true black. Use the midpoint slider to balance the overall brightness. This is your exposure foundation.
Add Contrast — Curves on Luminosity
Add a Curves adjustment layer, set blend mode to Luminosity. Create a gentle S-curve: raise the upper-quarter point slightly, lower the lower-quarter point slightly. This adds contrast without shifting skin color.
Fix Skin Color — Hue/Saturation Clipped
Add a Hue/Saturation adjustment layer clipped to your subject layer only. From the channel dropdown, select Reds. Reduce saturation by 5–10 to tame overly orange skin. Select Yellows and do the same if needed.
Dodge and Burn — Two Curves Masked
Add a Curves layer and pull the midpoint up (brightening). Fill the mask with black (Ctrl+Backspace). Paint white on the mask with a soft brush over areas you want to brighten — catch light on cheekbones, brightest area of the eyes. Repeat with a darkening Curves layer for shadows. This is non-destructive dodge and burn.
Color Grade — Gradient Map on Soft Light
Add a Gradient Map using a warm shadow tone and a cool highlight tone. Set blend mode to Soft Light, opacity to 20–30%. This adds stylized color depth without overpowering the natural tones.
Final Check — Toggle Each Layer
Click the eye icon on each adjustment layer in turn to see its individual contribution. If any single layer looks too strong, lower its opacity. This review step catches problems before export.
Keyboard Shortcuts Reference
| Action | Windows | Mac |
|---|---|---|
| Levels | Ctrl+L | Cmd+L |
| Curves | Ctrl+M | Cmd+M |
| Hue / Saturation | Ctrl+U | Cmd+U |
| Color Balance | Ctrl+B | Cmd+B |
| Black & White dialog | Ctrl+Alt+Shift+B | Cmd+Option+Shift+B |
| Invert | Ctrl+I | Cmd+I |
| Clipping Mask (toggle) | Ctrl+Alt+G | Cmd+Option+G |
| Group Layers | Ctrl+G | Cmd+G |
| Cycle Blend Modes | Shift+ + (Move Tool) | Shift+ + (Move Tool) |
| Fill Mask with Black | Ctrl+Backspace | Cmd+Delete |
| Fill Mask with White | Alt+Backspace | Option+Delete |
Common Mistakes With Adjustment Layers
Mistake 1 — Editing pixels with Image → Adjustments instead of adjustment layers. Once you save over a direct edit, it is permanent. There is never a reason to choose destructive editing for tonal and color work when adjustment layers exist.
Mistake 2 — Forgetting the layer mask. Every adjustment layer comes with a mask for free. Many users apply a global Curves correction and wonder why the sky is blowing out. The answer is always: paint black on the mask over the sky to protect it.
Mistake 3 — Not using clipping masks for isolated adjustments. An adjustment layer affecting your entire document when you only wanted to correct one product element is a very common workflow error. Always ask: should this affect all layers, or just one?
Mistake 4 — Not checking blend mode when effects look wrong. If a Curves or Hue/Saturation layer produces unexpected color shifts, check the blend mode. A layer accidentally set to Overlay or Color when it should be Normal will produce confusing results.
Mistake 5 — Using Brightness/Contrast for everything. Brightness/Contrast is blunt — it lifts all values uniformly. Levels lets you target shadows, midtones, and highlights independently. Curves gives you even finer control. As soon as your work involves any precision, move past Brightness/Contrast.
Mistake 6 — Ignoring the new Clarity and Grain layers (2026). If you are still round-tripping to Camera Raw to add Clarity or Grain to a specific layer, update to Photoshop 2026 version 27.3. These are now native adjustment layers with full mask support.
Recommended Tutorials — Photoshop Adjustment Layers
Visual walkthroughs for every technique covered in this guide:
Search: 'Photoshop adjustment layers complete guide beginners'
Search: 'Photoshop curves adjustment layer tutorial'
Search: 'Gradient map color grading Photoshop'
Search: 'Photoshop clipping mask adjustment layer'
Search: 'Non destructive editing Photoshop adjustment layers'
Search: 'Hue Saturation vs Selective Color Photoshop'
Need PSD Help?
Your time is worth more than solving pixel errors. Hire a professional editor to handle the technical work while you focus on your business.
Frequently Asked Questions
What are adjustment layers in Photoshop?+
Adjustment layers are special layers that apply color and tonal corrections to all layers beneath them non-destructively. The original pixel data is never changed. You can edit, disable, or delete the adjustment at any time without any quality loss.
How do I create an adjustment layer in Photoshop?+
Three ways: (1) Click the half-black, half-white circle at the bottom of the Layers panel. (2) Go to Layer → New Adjustment Layer and choose a type. (3) Open Window → Adjustments and click any icon. All methods create a non-destructive layer with an automatic mask attached.
Do adjustment layers affect all layers below them?+
Yes, by default. To limit an adjustment layer to just one specific layer, use a Clipping Mask — either Alt/Option-click between the adjustment layer and the target layer, or press Ctrl+Alt+G (Windows) / Cmd+Option+G (Mac).
What is the difference between Levels and Curves in Photoshop?+
Both control tonal range, but Curves is significantly more powerful. Levels has three input points (shadows, midtones, highlights) for broad corrections. Curves lets you place multiple control points anywhere on the tonal range — you can selectively brighten only the midtones while leaving shadows and highlights unchanged. Professionals use Curves for precision; Levels for speed.
How do I make an adjustment layer affect only part of an image?+
Use the built-in mask attached to every adjustment layer. Click the white mask thumbnail in the Layers panel. Paint with a black brush where you want to hide the effect. Use the Gradient tool on the mask for smooth transitions — for example, fading a sky correction into the foreground.
Do adjustment layers reduce image quality?+
No. Adjustment layers store their settings as instructions, not pixel changes. Photoshop calculates the effect on-the-fly during display and export. No matter how many adjustment layers you stack or edit, the original pixels are never touched and there is no generational quality loss.
What is the Gradient Map adjustment layer used for?+
Gradient Map replaces your image's tonal range with the colors from a gradient — shadows take the left color, highlights take the right. At Normal blend mode and full opacity, it creates bold color effects. At reduced opacity or with Soft Light blend mode, it creates elegant cinematic color grades. It is one of the most versatile creative tools in Photoshop.
What are the new adjustment layers added in Photoshop 2026?+
Photoshop version 27.3 (January 2026) added three new native adjustment layers: Color & Vibrance (brings Temperature and Tint white-balance controls directly into the layers panel), Clarity and Dehaze (boosts midtone contrast and removes atmospheric haze via a single panel), and Grain (adds non-destructive film texture).
Can I use adjustment layers in Photoshop Elements?+
Yes. Photoshop Elements supports adjustment layers in Expert mode, accessible via the Enhance menu. The main types — Levels, Hue/Saturation, Brightness/Contrast, and Curves — are available. The full set of 19 types, including the 2026 additions, is only in full Photoshop CC.
Conclusion
Adjustment layers are the single most important concept separating casual Photoshop users from professionals. The workflow difference is decisive: with adjustment layers, every decision is reversible, every effect is maskable, and every correction can be refined indefinitely. Without them, every edit is permanent and fragile.
The progression for learning them is straightforward. Start with Brightness/Contrast for simple exposure fixes. Move to Levels once you understand histograms. Graduate to Curves for precise tonal work. Add Hue/Saturation for color shifts. Use Gradient Map for creative color grades. Master clipping masks for isolated adjustments. That covers the vast majority of professional editing work.
And in 2026, add Color & Vibrance, Clarity and Dehaze, and Grain to your workflow — three new adjustment layers that completely eliminate the need to round-trip to Camera Raw for some of your most essential non-destructive edits.
Take Your Photoshop Editing to the Next Level
Whether you need professional color grading, complex retouching workflows, or a partner to handle ongoing Photoshop projects — our verified design team is ready to help. From adjustment layer masking to cinematic color grade pipelines, get expert Photoshop work done right.
Need PSD Help?
Your time is worth more than solving pixel errors. Hire a professional editor to handle the technical work while you focus on your business.
About the Author
Devla Sarika Singh
Image Editor | PSD Mockup Designer | Photoshop Expert
I am a professional image editor specializing in Photoshop, custom PSD mockups, and high-quality image editing. I help businesses and creators convert images into editable mockups, with services like background removal, bulk mockups, and product image editing.