Why Does Image Quality Drop When You Resize?
You resize a photo, and it comes back blurry or pixelated. It feels like a Photoshop failure — but it is actually a physics problem.
Every digital image is made of a fixed grid of pixels. When you make it smaller, Photoshop throws some pixels away. When you make it larger, Photoshop has to invent new pixels to fill the gaps — and it guesses what those pixels should look like based on the surrounding colors. The quality of that guess is what separates a sharp result from a blurry one.
The method you choose, the resampling algorithm, and whether you protect your original data all determine whether your resize looks professional or amateur. This guide covers all six methods, ranked from fastest to most powerful, so you can pick the right one for every situation.
The Core Rule
Reducing size (downscaling) is almost always safe — quality loss is minimal. Increasing size (upscaling) is where problems happen. Photoshop has to create pixels that did not exist, and the results depend entirely on which method you use. Always start from the highest resolution original you have.
Before you do anything: save a copy. Go to File → Save As and give the file a new name. Never resize your only original. If something goes wrong, you need to be able to start over.
3 Concepts You Must Understand Before Resizing
These three terms appear in every resize dialog. Understanding them prevents the most common mistakes.
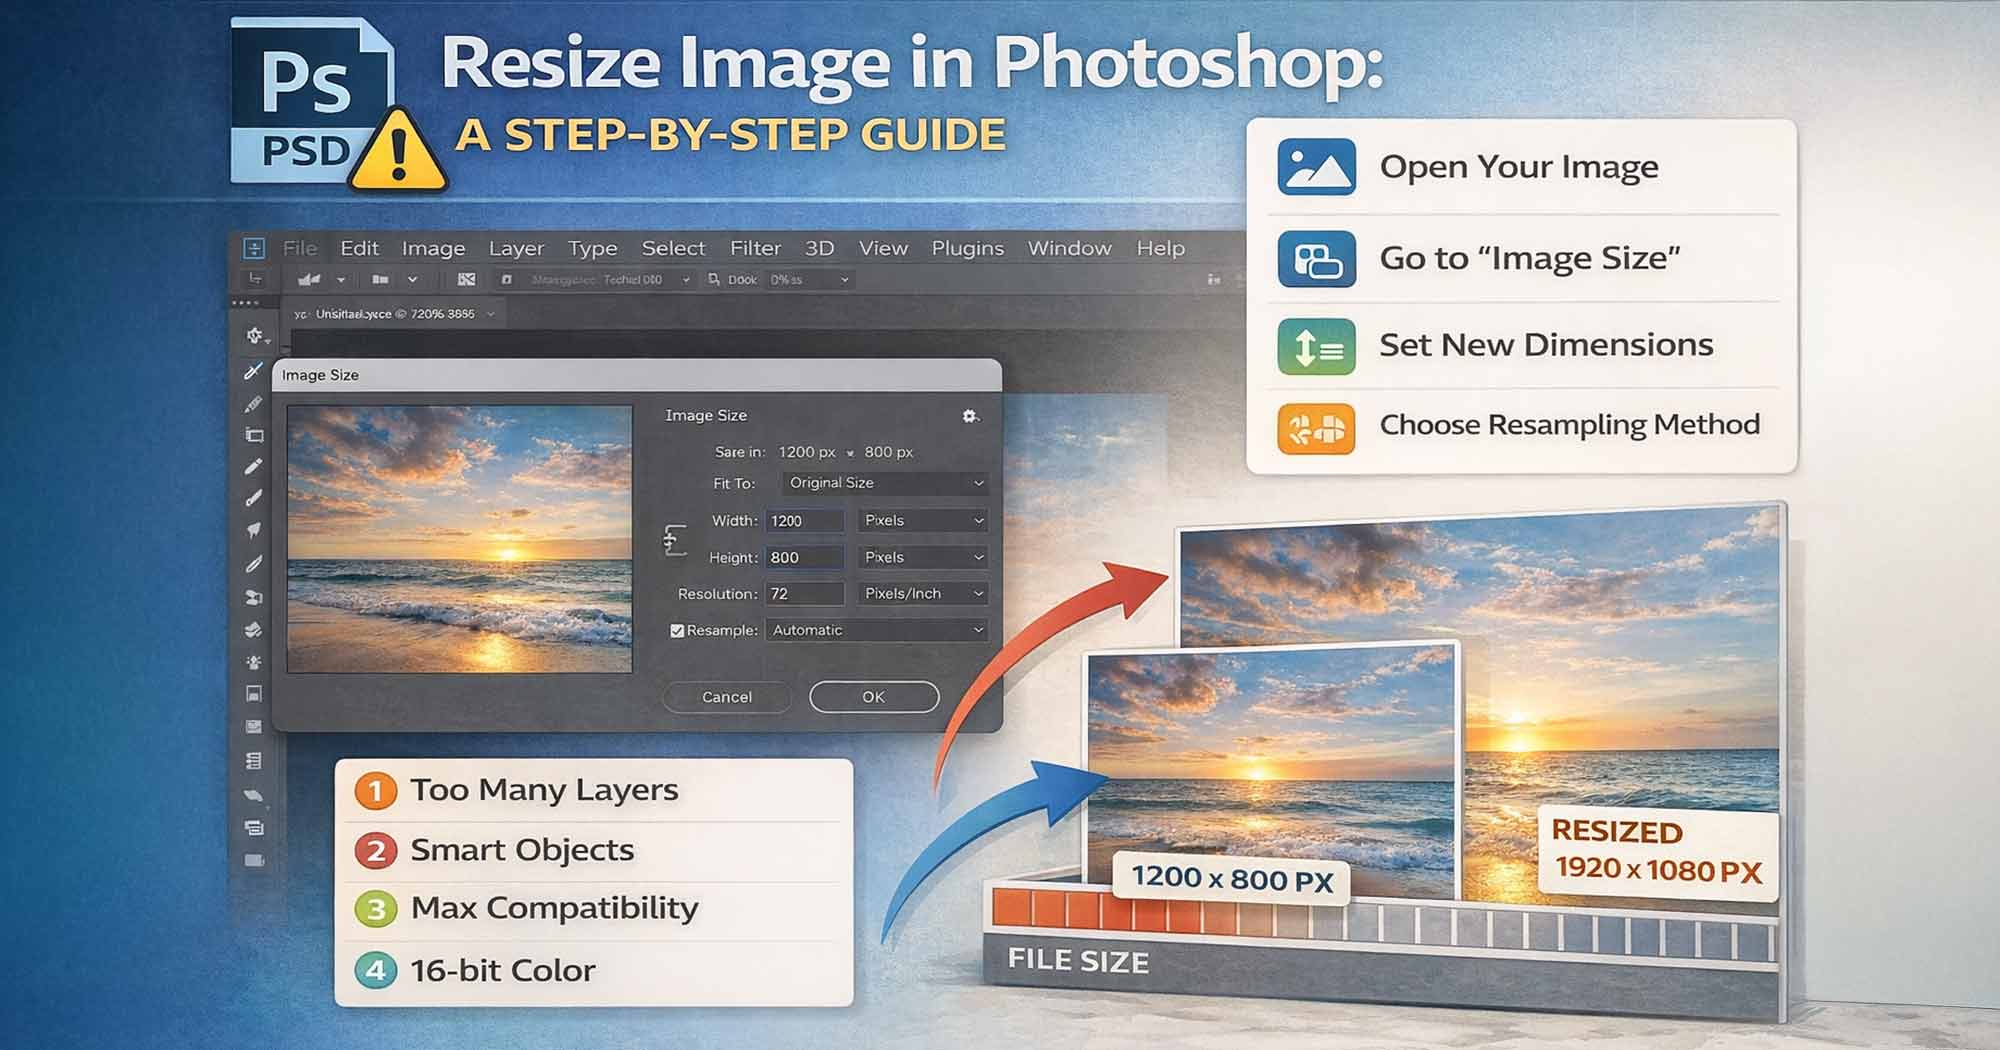
Method 1: Image Size Dialog — The Standard Method
Best for: Web graphics, social media, email, and any project where you need to hit specific pixel dimensions quickly.
The Image Size dialog is the most direct way to resize in Photoshop. It gives you precise control over width, height, resolution, and the resampling algorithm — all in one window.
Open Your Image
Go to File → Open or press Ctrl+O (Mac: Cmd+O) to open your image in Photoshop.
Save a Backup Copy First
Before changing anything, go to File → Save As and save a copy with a new name. Protect your original PSD file — never resize directly on your only version.
Open the Image Size Dialog
Go to Image → Image Size or press Ctrl+Alt+I (Mac: Cmd+Option+I). A dialog box opens showing current width, height, and resolution.
Check the Chain Icon (Aspect Ratio Lock)
The small chain link icon between Width and Height keeps your proportions locked. Make sure it is enabled. If you disable it, you can enter different values for width and height — but the image will stretch. Keep it locked unless you have a specific reason to distort.
Enter Your Target Dimensions
Type the new width or height value. The other dimension adjusts automatically. Choose your unit from the dropdown: Pixels for web, Inches for print, Percent for scaling by a percentage. For resolution: set 72 PPI for web, 300 PPI for print.
Choose a Resampling Method
At the bottom of the dialog is the Resample dropdown. For most situations, Automatic works well. For specific use cases, see the full Resampling Guide further below.
Click OK and Check at 100%
Click OK to apply the resize. Press Ctrl+1 (Mac: Cmd+1) to zoom to 100% and check the real quality. Any other zoom level can make a soft image look sharp or a sharp image look soft. Always verify at 100%.
Export the Result
For the best output, use File → Export → Export As (Ctrl+Shift+Alt+W / Cmd+Shift+Option+W) rather than a plain Save. This gives you format and quality controls before writing the final file.
Pro Tip
The Resample checkbox in the Image Size dialog controls whether pixel data is added or removed. If Resample is off, changing the resolution only affects print output size — the pixel count stays the same and file quality is unchanged. If Resample is on, Photoshop actually adds or removes pixels.
Method 2: Smart Object — The Non-Destructive Best Practice
Best for: Any project where the final size is not yet fixed, or where you may need to resize multiple times.
A Smart Object is a special layer type that stores the original image data inside a protected container. No matter how many times you scale it up, scale it down, rotate it, or apply filters — the original data is preserved and Photoshop always renders from the source. This is the professional standard for working files.
What Is a Smart Object?
When you convert a layer to a Smart Object, Photoshop wraps the original pixel data in a container that cannot be permanently altered by transforms or filters. Any resize, rotation, or Smart Filter is stored as an instruction, not burned into the pixels. The original is always intact.
Convert the Layer to a Smart Object
In the Layers panel, right-click your layer and select "Convert to Smart Object." A small icon appears in the layer thumbnail — this confirms the conversion is complete.
Use Free Transform to Resize
Press Ctrl+T (Mac: Cmd+T) to activate Free Transform, or go to Edit → Free Transform. Drag the corner handles to resize visually. To control aspect ratio, use the chain/lock icon in the Options Bar at the top — this is the most reliable method across all Photoshop versions.
Enter Exact Percentage Values (Optional)
In the Options Bar, you can type exact percentage values in the W and H fields for precise scaling. For example: W: 75% reduces the layer to three-quarters of its original size.
Confirm the Transformation
Press Enter to apply, or press Esc to cancel without any changes.
Why This Matters in Practice
If you resize a normal pixel layer to 20% of its original size, then change your mind and scale it back to 100%, you get a blurry result — the pixels that were discarded are gone. With a Smart Object, scaling back to 100% restores the full original quality. Always convert to Smart Object before resizing any layer you might need to scale again.
Method 3: Preserve Details 2.0 — Best for Upscaling
Best for: Enlarging an image — for example, making a small photo large enough for print without visible quality loss.
Upscaling is the hardest resize task. When you add pixels that did not exist, Photoshop must invent them. Preserve Details 2.0 uses a machine learning algorithm specifically trained for this — it analyzes the image content and generates plausible new detail rather than simply blurring neighboring pixels together.
Open Image Size
Go to Image → Image Size or press Ctrl+Alt+I (Mac: Cmd+Option+I).
Enable Resample
Make sure the Resample checkbox is checked. Without it, you cannot add pixels.
Select Preserve Details 2.0
Click the Resample dropdown and choose Preserve Details 2.0. If you do not see it, enable it first:
- Windows:
Edit → Settings → Technology Previews - Mac:
Photoshop → Settings → Technology Previews
Check the box labeled "Enable Preserve Details 2.0 Upscale", then click OK and restart Photoshop.
Set Your Target Size
Enter the target width, height, or percentage. Preserve Details 2.0 works best at 2x enlargements. At 3x–4x, results become noticeably softer. Beyond 4x, even this algorithm produces significant quality loss — use Generative Upscale instead.
Adjust the Noise Reduction Slider
After upscaling, the image may show some grain or artificial texture. The Noise Reduction slider (visible when Preserve Details 2.0 is selected) helps smooth this. Start at 10–20% and increase only if needed. Setting it too high will destroy the fine detail the algorithm just created.
Preview and Confirm
Check the preview in the dialog. Zoom in on a detailed area. Click OK if satisfied.
Honest Expectation Setting
No algorithm can truly recreate information that was never captured. If your original image is 200 × 200 pixels, Preserve Details 2.0 will produce a better enlargement than any other built-in Photoshop method — but it will not produce the same result as starting from a 2000 × 2000 original. Always use the highest-resolution source you have.
Method 4: Free Transform Tool — Quick Visual Resize
Best for: Resizing a layer within a composition — adjusting an element in a collage, mockup, or layout without needing exact pixel numbers.
Select the Layer
In the Layers panel, click the layer you want to resize to make it active.
Activate Free Transform
Press Ctrl+T (Mac: Cmd+T) or go to Edit → Free Transform. A bounding box with handles appears around the layer.
Resize by Dragging or Typing
Drag a corner handle to resize visually. For exact control, type percentage values directly in the W and H fields in the Options Bar. Example: typing 50% in W and H reduces the layer to half its size.
Control Aspect Ratio
Use the chain/lock icon in the Options Bar to toggle proportional scaling. When locked, width and height change together. This is the reliable cross-version method — more consistent than relying on the Shift key.
Confirm
Press Enter to apply, or Esc to cancel.
Important Warning
Free Transform on a normal pixel layer degrades quality each time you resize. If you scale down to 20%, confirm, then scale up again — the pixels you lost are not coming back. Always convert to a Smart Object before using Free Transform if there is any chance you will resize again.
Method 5: Export As — Best for Web Output
Best for: Finalizing images for web use — websites, social media, email — where you need the right balance of visual quality and small file size.
Export As is different from saving. It lets you control format, quality, and dimensions all at once, and it writes a new export file without touching your working PSD.
Open Export As
Go to File → Export → Export As, or press Ctrl+Shift+Alt+W (Mac: Cmd+Shift+Option+W).
Choose the Right Format
JPEG — best for photographs and images with gradients. Produces small files with slight lossy compression. PNG — best for logos, graphics, and anything with transparency. Lossless, larger file size. WebP — best overall for modern web use. Typically 25–35% smaller than JPEG at equivalent visual quality. TIFF — for print deliverables that need to leave Photoshop uncompressed.
Set Output Dimensions
In the right panel under Image Size, enter your target width or height. You can also type a percentage to scale relative to current size.
Set Quality (JPEG)
For JPEG, a Quality setting of 70–80% is the sweet spot for web use. File size drops significantly below 80% with virtually no visible quality difference at screen resolution. Use the 2-Up tab to compare original and export side by side before committing.
Click Export All
The file saves to your chosen location. Your original PSD remains unchanged.
Method 6: AI Generative Upscale — Photoshop 2026
Best for: Significantly enlarging low-resolution images — old photos, small product shots, images that need to be prepared for large-format print.
Generative Upscale was released in Photoshop 2026 (version 27.0, October 2025). It uses Adobe Firefly AI to reconstruct image detail during upscaling — not just blending nearby pixels, but intelligently generating plausible texture and structure based on image content.
Confirm Your Photoshop Version
Generative Upscale requires Photoshop 2026 (version 27.0) or later. Check via Help → About Photoshop. Earlier versions do not have this feature.
Open Generative Upscale
Go to Image → Generative Upscale. This opens a dedicated dialog — it is not inside the Image Size dialog or the Resample dropdown.
Select an AI Model
Three models are available:
- Firefly Upscaler — best for restoring low-resolution photos. Output limit: 6144 × 6144 px (square maximum, 37.7 megapixels). Costs 5 credits (images under 9 MP) or 10 credits (images over 9 MP).
- Topaz Gigapixel — best for preserving fine existing detail in sharp photography, up to 56 megapixels (premium subscription required). Costs 10–20 credits.
- Topaz Bloom — adds creative new detail; better suited for AI-generated images than real photographs (premium subscription required). Costs 35 credits.
Choose Scale Factor
Select 2x, 3x, or 4x. The Firefly Upscaler's hard output ceiling is 6144 × 6144 px — if your selected scale would exceed this, Photoshop will automatically cap the output and warn you. Topaz Gigapixel supports up to 56 megapixels. If your selected scale exceeds the model's limit, Photoshop will warn you and suggest adjusting.
Click Upscale
Photoshop processes the image and outputs the result as a new document — your original file is not modified. Review the output and save it separately.
Generative Upscale — Credit Cost by Model
Generative Upscale consumes Firefly generative credits. Topaz models cost significantly more than the standard Firefly Upscaler:
| Model | Credit Cost |
|---|---|
| Firefly Upscaler (under 9 MP) | 5 credits |
| Firefly Upscaler (over 9 MP) | 10 credits |
| Topaz Gigapixel | 10–20 credits |
| Topaz Bloom | 35 credits |
Free plan users have a limited monthly credit allowance. Monitor your usage at Help → Manage Creative Cloud Account.
Generative Upscale vs Preserve Details 2.0
For AI-generated images, heavily edited composites, or old low-resolution photos, Generative Upscale produces significantly better results. For real photographs where you want to preserve exactly what was captured — without the AI reimagining any details — Preserve Details 2.0 or Topaz Gigapixel (if available) often gives more authentic results, as some users report Generative Upscale can make faces and textures look slightly rendered rather than photographic.
Need PSD Help?
Your time is worth more than solving pixel errors. Hire a professional editor to handle the technical work while you focus on your business.
Resampling Methods: Which One to Use?
The Resample dropdown in the Image Size dialog is the most confusing part of resizing for most users. Here is a complete, plain-language guide to every option:
| Method | When to Use | Quality Rating |
|---|---|---|
| Automatic | Photoshop selects the best algorithm based on whether you are scaling up or down. | Safe Default |
| Preserve Details 2.0 | Upscaling at 2x. AI-based. Best built-in option. Quality drops noticeably at 3x–4x. | Best at 2x |
| Bicubic Sharper | Reducing image size (downscaling). Keeps edges crisp. Best for logos and product shots. | Best Reducing |
| Bicubic Smoother | Enlarging images where you want a soft, smooth result (portraits). | Good |
| Bicubic | Smooth gradients and general-purpose scaling. Slower but accurate. | Moderate |
| Bilinear | Fast processing, moderate quality. Simple graphics. | Moderate |
| Nearest Neighbor | Deliberately pixelated output. Pixel art or retro style. | Pixel Art Only |
Quick Decision Guide
- Reducing for web or email → Bicubic Sharper
- Making larger for print → Preserve Details 2.0
- Portrait or skin enlargement → Bicubic Smoother
- Not sure → Automatic
- Pixel art or retro style → Nearest Neighbor
Resolution Guide: Web vs Print
Getting resolution wrong is one of the most common reasons a resized image looks bad — either unnecessarily large for web use, or too small and blurry when printed.
Platform-Specific Size Reference
| Platform | Recommended Size | Best Format |
|---|---|---|
| Instagram Post (Square) | 1080 × 1080 px | JPEG / PNG |
| Instagram Story / Reel | 1080 × 1920 px | JPEG / PNG |
| Facebook Cover Photo | 820 × 312 px | JPEG |
| YouTube Thumbnail | 1280 × 720 px | JPEG |
| LinkedIn Banner | 1584 × 396 px | JPEG / PNG |
| Website Blog Image | 1200 × 628 px | JPEG / WebP |
| Business Card (Print) | 1050 × 600 px @ 300 DPI | TIFF / PDF |
| A4 Flyer (Print) | 2480 × 3508 px @ 300 DPI | TIFF / PDF |
Keyboard Shortcuts Reference
| Action | Windows | Mac |
|---|---|---|
| Open Image Size Dialog | Ctrl+Alt+I | Cmd+Option+I |
| Free Transform | Ctrl+T | Cmd+T |
| Export As | Ctrl+Shift+Alt+W | Cmd+Shift+Option+W |
| Save for Web (Legacy) | Ctrl+Alt+Shift+S | Cmd+Option+Shift+S |
| Undo Last Action | Ctrl+Z | Cmd+Z |
| Zoom to 100% | Ctrl+1 | Cmd+1 |
| Fit Image on Screen | Ctrl+0 | Cmd+0 |
| Open File | Ctrl+O | Cmd+O |
| Save As | Ctrl+Shift+S | Cmd+Shift+S |
Common Mistakes That Destroy Resize Quality
These are the errors that cause most resize failures. Check each one before you consider a resize "done."
Mistake 1 — Overwriting the original file. Once you resize and save over your original, the old pixel data is gone. Always use File → Save As to create a new copy before resizing. If your original ever becomes corrupted or the result is wrong, you need to be able to start over. If you do accidentally overwrite a file, see our guide on recovering a corrupted PSD file.
Mistake 2 — Not locking the aspect ratio. Resizing with the chain icon off means width and height change independently. The result is a stretched or squished image that looks unnatural. Unless you deliberately want distortion, keep the chain locked at all times.
Mistake 3 — Upscaling a tiny original and expecting a sharp result. A 100 × 100 pixel image cannot be resized to 2000 × 2000 pixels with professional quality — no matter which algorithm you use. The data was never there to begin with. Always source the highest-resolution original available.
Mistake 4 — Resizing a normal layer multiple times without Smart Objects. Each time you transform a pixel layer, quality degrades. If you resize to 30%, confirm the transform, then resize to 200%, you get a blurry result. Convert to Smart Object first — then you can scale freely without cumulative loss.
Mistake 5 — Using 72 PPI for print output. 72 PPI looks sharp on a screen but produces a visibly pixelated result on any professional printer. Print output requires a minimum of 300 DPI. If someone asks for a "300 DPI image at 6 × 4 inches," that means the pixel dimensions need to be 1800 × 1200 pixels — not 432 × 288.
Mistake 6 — Choosing Nearest Neighbor for photographs. Nearest Neighbor creates hard pixel edges with no blending between colors. It is the right choice for pixel art. For any real photograph or graphic with gradients, it produces a blocky, broken result.
Mistake 7 — Not checking quality at 100% zoom. Photoshop's display at 50% or 25% zoom uses its own downsampling, which can make a soft image look sharp. The only honest view of resize quality is at 100% zoom (Ctrl+1 / Cmd+1). Always check here before exporting.
Mistake 8 — Confusing file size with image quality. A 5MB JPEG is not automatically better quality than a 500KB JPEG. Format, compression settings, and original pixel dimensions determine quality — not file size alone.
Quick Method Selector
Not sure which method to use? Match your situation:
| Your Situation | Best Method |
|---|---|
| Resize for Instagram, Facebook, web banner | Method 1 — Image Size Dialog |
| You will resize multiple times, or final size is unknown | Method 2 — Smart Object |
| Making a small image larger for print | Method 3 — Preserve Details 2.0 |
| Adjusting a layer within a layout visually | Method 4 — Free Transform |
| Exporting a final version for a website | Method 5 — Export As |
| Dramatically enlarging a very low-res photo | Method 6 — Generative Upscale (PS 2026) |
Recommended Tutorials — Photoshop Resize
Watch these for practical walkthroughs of the methods covered in this guide:
Adobe Creative Cloud — Official step-by-step tutorial
Search: 'Photoshop Preserve Details 2.0 upscaling tutorial'
Search: 'Smart Objects Photoshop resize non-destructive'
Search: 'Generative Upscale Photoshop 2026 tutorial'
Frequently Asked Questions
What is the best way to resize an image in Photoshop without losing quality?+
Convert the layer to a Smart Object first, then use Image Size (Ctrl+Alt+I) with Preserve Details 2.0 for upscaling, or Bicubic Sharper for downscaling. This approach preserves original data and uses the best available algorithm for the direction of resize.
Why does my image look blurry after resizing?+
Blurriness after a resize is almost always caused by upscaling — making an image larger forces Photoshop to invent pixels that did not exist. To minimize this, use Preserve Details 2.0 or Generative Upscale (Photoshop 2026). Also verify quality at 100% zoom (Ctrl+1) — other zoom levels can mislead you.
What is the keyboard shortcut to resize an image in Photoshop?+
To open the Image Size dialog: Ctrl+Alt+I (Windows) or Cmd+Option+I (Mac). To activate Free Transform for visual resizing: Ctrl+T (Windows) or Cmd+T (Mac).
What is the difference between a Smart Object and a normal layer when resizing?+
A normal pixel layer permanently loses data each time you transform it — scale it down and back up, and quality is gone. A Smart Object stores the original pixel data inside a protected container. You can scale it up and down any number of times, and it always renders from the original source without cumulative quality loss.
What resolution should I use for web vs print?+
For web: 72 PPI is standard. Retina / HiDPI displays benefit from 150 PPI. For print: 300 DPI minimum for standard commercial printing. 600 DPI for fine art or premium photography printing. Using web resolution for print output produces blurry, pixelated results.
What is the best image format for web export?+
WebP is the best format for modern web use — typically 25–35% smaller than JPEG at equivalent quality. JPEG is the safe choice for broad browser compatibility. PNG is for graphics, logos, and images that require transparency. TIFF is for print deliverables.
Can I resize an image larger without losing quality?+
You can minimize quality loss, but you cannot avoid it entirely when upscaling. Preserve Details 2.0 gives the best results from the Image Size dialog. Generative Upscale (Photoshop 2026) produces significantly better results for low-resolution source images, though it uses Firefly generative credits. The best outcome always starts from the highest-resolution original available.
What is the Generative Upscale feature and which version of Photoshop has it?+
Generative Upscale is an AI-powered enlargement tool that uses Adobe Firefly to reconstruct image detail during upscaling. It is available in Photoshop 2026 (version 27.0) released in October 2025. Access it via Image → Generative Upscale. It uses Firefly generative credits and outputs results to a new document.
What is the aspect ratio and why does it matter when resizing?+
Aspect ratio is the proportional relationship between an image's width and height — for example 16:9, 4:3, or 1:1. If you change width without proportionally changing height, the image stretches horizontally. If you change height without width, it compresses vertically. In Photoshop, the chain icon in the Image Size dialog keeps the ratio locked. Always keep it locked unless deliberate distortion is the goal.
Conclusion
Resizing in Photoshop without losing quality comes down to three decisions: which method to use, which resampling algorithm to apply, and whether you protect your original with a Smart Object.
For most designers, the workflow is straightforward: use Smart Objects to protect the original, use Bicubic Sharper when going smaller, and use Preserve Details 2.0 or Generative Upscale when going larger. Export with Export As for web, and always verify the result at 100% zoom before sending anything out.
Quick method recap:
- Resize for web/social media → Image Size Dialog (Method 1)
- Non-destructive professional workflow → Smart Object (Method 2)
- Upscaling for print → Preserve Details 2.0 (Method 3)
- Visual layer adjustment in a layout → Free Transform (Method 4)
- Web export with quality control → Export As (Method 5)
- Dramatically enlarging a low-res photo → Generative Upscale (Method 6, PS 2026+)
The best resize is the one you planned before you started. Know your target dimensions, your output medium, and your source resolution — and the right method becomes obvious.
Need a Professional to Handle Your Photoshop Files?
If you're spending too much time resizing, exporting, or optimizing PSD files for print or web — our verified Fiverr design professionals can handle it for you. From Smart Object workflows to batch export pipelines, get it done right the first time.
Need PSD Help?
Your time is worth more than solving pixel errors. Hire a professional editor to handle the technical work while you focus on your business.
About the Author
Devla Sarika Singh
Image Editor | PSD Mockup Designer | Photoshop Expert
I am a professional image editor specializing in Photoshop, custom PSD mockups, and high-quality image editing. I help businesses and creators convert images into editable mockups, with services like background removal, bulk mockups, and product image editing.